Finding the perfect ski boots is one of the most important steps to enjoying your time on the mountain. An improper fit can lead to discomfort, cold feet, poor control, and even injury. But how do you know if your ski boots fit correctly? In this comprehensive guide, we'll break down the signs of a proper fit, how to check your boots at home or in-store, and what to do if your boots aren't quite right. Whether you're a first-time buyer or a seasoned skier, this guide will help you make the best choice for comfort, performance, and safety.
Why Proper Ski Boot Fit Matters
Ski boots are the critical connection between your body and your skis. A well-fitted boot ensures:
- Efficient power transfer for better control
- Reduced fatigue and increased comfort
- Warmth and protection from the elements
- Lower risk of injury
On the other hand, a poor fit can cause pressure points, numbness, blisters, and even compromise your skiing technique. That's why understanding how to tell if ski boots fit correctly is essential for every skier.
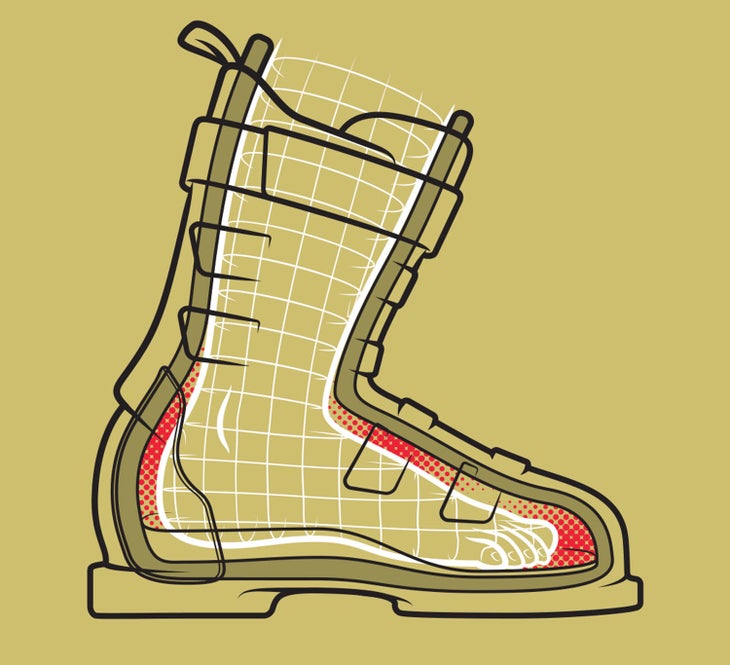
Key Signs Your Ski Boots Fit Correctly

Let's break down the main indicators of a proper ski boot fit:
1. Snug, Not Painful, Everywhere
Your ski boots should feel snug all around your foot, like a firm handshake. There should be no loose areas, but also no sharp pain or pinching. It's normal for new boots to feel tighter than your regular shoes, but discomfort that persists after a few minutes is a red flag.
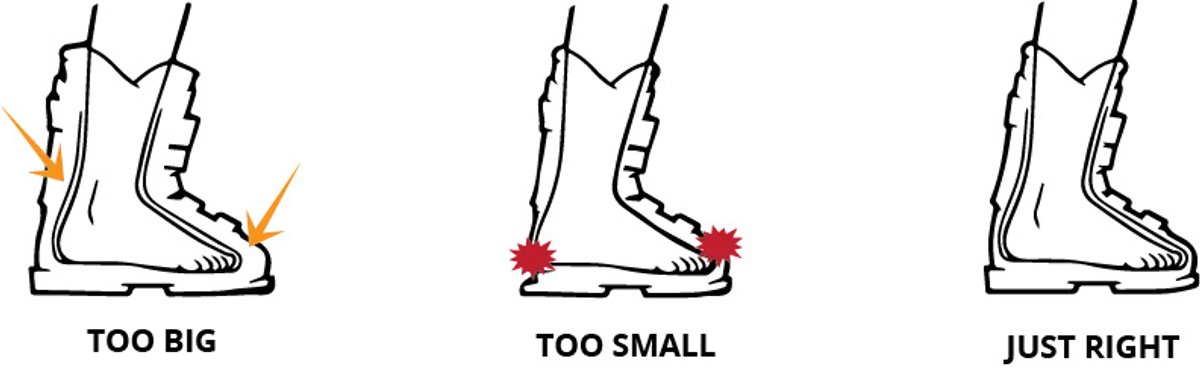
2. Toes Lightly Touch the Front (Standing Upright)
When you first put on your boots and stand upright, your toes should lightly brush the front of the boot. They shouldn't be curled or jammed, but you should feel their presence at the end.
3. Toes Pull Back When Flexed Forward
When you flex forward into a skiing stance (knees bent, shins pressing into the tongue), your toes should pull back slightly, leaving a small gap at the front. This is a critical test—if your toes are still jammed when flexed, the boots are likely too small.
4. Heel Is Secure with Minimal Lift
Your heel should stay locked in place when you flex forward or walk around. Minimal heel lift (a couple of millimeters) is okay, but significant movement means the boots are too big or the wrong shape for your foot.
5. No Hot Spots or Pressure Points
After wearing the boots for 10-15 minutes, you shouldn't feel any sharp pressure points or 'hot spots.' If you do, this could indicate a mismatch in boot shape (last) or volume.
6. Buckles Close Securely Without Excessive Force
You should be able to close the buckles securely without straining or leaving them too loose. If you have to force the buckles to get a snug fit, the boots may be too big or too small.
7. No Excessive Foot Movement Inside the Boot
Try wiggling your foot side to side and up and down. There should be minimal movement. Too much room can reduce control and cause blisters.
Step-by-Step: How to Check Ski Boot Fit
Follow these steps for a thorough fit check, whether you're in a ski shop or at home:
- Wear the Right Socks: Use thin, synthetic or wool ski socks. Avoid thick or cotton socks, which can distort the fit.
- Put on the Boots Properly: Slide your foot in, tap your heel back, and fasten the buckles from bottom to top. Tighten the power strap.
- Stand Upright: Check that your toes lightly touch the front.
- Flex Forward: Bend your knees and press your shins into the tongue. Your toes should pull away from the front.
- Walk Around: Take a few steps. Your heel should stay put, and you shouldn’t feel any major pressure points.
- Wear Them for 10-15 Minutes: Let your foot settle. Any discomfort that persists is a warning sign.
- Check Buckle Tension: Ensure the buckles close snugly without excessive force.
Common Ski Boot Fit Problems (and Solutions)
If your boots don’t feel quite right, you’re not alone. Here are some common issues and what they mean:
|
Problem |
Possible Cause |
Solution |
|---|---|---|
|
Toes Jammed |
Boots too small, wrong shape |
Try a larger size or different last |
|
Heel Lifting |
Boots too big, too wide at heel |
Try a smaller size or narrower boot; consider custom footbeds |
|
Pressure on Instep |
High arches, low-volume boots |
Try boots with higher instep or custom insoles |
|
Numb Toes |
Boots too tight, poor circulation |
Loosen buckles, check sock thickness, consider boot stretching |
|
Blisters |
Too much movement inside boot |
Try a snugger fit, custom liners, or footbeds |
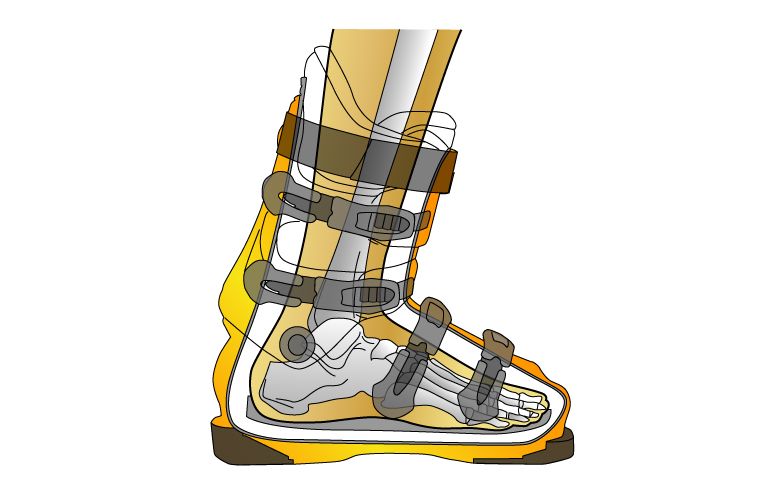
Understanding Ski Boot Sizing and Shape
Ski boots are measured in mondopoint sizing (the length of your foot in centimeters). However, length is only part of the equation. The last (width) and volume (overall space inside the boot) are equally important. Some boots are designed for narrow, low-volume feet, while others fit wider, higher-volume feet. Try multiple models and brands to find your best match.
Should Ski Boots Feel Tight?
Yes, ski boots should feel tighter than regular shoes or snowboard boots. However, they should not cause pain, numbness, or cut off circulation. Remember that ski boots will "pack out" (the liner compresses) after a few days of skiing, so a new boot should start snug to account for this.
How to Break In New Ski Boots
Even the best-fitting boots can feel stiff and snug at first. Here’s how to break them in:
- Wear them at home for short periods
- Use a boot dryer or warm the liners gently before wearing
- Have a boot fitter make small adjustments if needed
Never try to "break in" boots by skiing in pain—proper fit should be comfortable from the start.
When to See a Professional Boot Fitter
If you experience persistent pain, numbness, or fit issues, visit a professional boot fitter. They can:
- Assess your foot shape and biomechanics
- Heat-mold liners or shells for a custom fit
- Add custom insoles or footbeds
- Stretch or punch out specific areas of the boot
A boot fitter can make a world of difference, especially for those with unique foot shapes or recurring problems.
FAQs: How to Tell If Ski Boots Fit Correctly
How tight should ski boots feel?
Ski boots should feel snug everywhere, with your toes just brushing the front when standing and pulling back when flexed. They should not cause pain or numbness.
Can I make my ski boots fit better?
Yes! Custom insoles, heat-molded liners, and shell adjustments can all improve fit. A boot fitter can help with these modifications.
Is it normal for new ski boots to hurt?
Some initial tightness is normal, but persistent pain is not. Address any discomfort early to avoid long-term issues.
How do I know if my ski boots are too big?
If you feel your foot sliding, your heel lifting, or you have to overtighten the buckles, your boots may be too big.
Next Steps: Choosing the Right Ski Boots
Understanding how to tell if ski boots fit correctly is just one part of the buying process. If you're ready to dive deeper into ski boot selection, check out our comprehensive guide: Choosing the Right Ski Boots. You'll find tips on different types of boots, flex ratings, and how to match boots to your skiing style.
Conclusion
Proper ski boot fit is the foundation of a great day on the slopes. Remember: snug, supportive, and pain-free is the goal. Use the fit checks above, don’t hesitate to seek professional help, and prioritize comfort and control over size or brand. With the right fit, you'll ski better, stay warmer, and enjoy every run.
For more tips and expert advice on ski gear, visit our Ski Boots: Buyer Education & Selection hub.